Sunday, August 30, 2009

Mexican Chocolate "Speckled" Wedding Cookies


I’ve read recipes of Mexican Wedding Cookies for a long time now. The recipe resembles a shortbread recipe with some nuts incorporated into the dough and then dusted with powdered sugar when they come out of the oven.

Have I ever seen them at any Mexican wedding I’ve ever attended? NO. The traditional wedding cookie here in El Paso is the biscocho. I’ve always known biscochos as Polvorones. I learned how to make these with my Grandmother, Mi Chita, by memorizing the ingredients and many years later committing them to paper. These delightful little cookies are very often found at many Southwestern gatherings such as weddings, birthdays, baptismals and holidays like Christmas.

But my curiosity got the better of me. I’ve made the Pecan Sandies recipe found in the old BHG cookbook. This recipe reminded me of that. I looked in the Food Network recipe archives and found one that I knew I had all the ingredients for. Of course, I had to tweak it. I added some Mexican chocolate bits to it. The taste is quite delicious. So maybe I don’t go with the norm and make these as wedding cookies, but they do make a great treat. Enjoy.


(Mexican Chocolate Speckled) Wedding Cookies http://www.foodnetwork.com/recipes/mexican-wedding-cookies-recipe/index.html

( I made half of the recipe)
Ingredients
1 pound soft unsalted butter (2 sticks)
1 cup powdered sugar (1/2 cup)
2 tablespoons vanilla (1 tablespoon)
1 teaspoon salt (pinch)
2 cups finely chopped pecans (1 cup)
5 cups sifted pastry flour (2 ½ cups)
Powdered sugar for dusting
3/4 cup Mexican chocolate chopped into tiny bits

Directions
Preheat oven to 350 degrees. Beat butter and powdered sugar in mixer until light and fluffy, about 10-15 minutes.

Add vanilla, salt and pecans. Fold in Mexican chocolate bits. Remove from mixer and stir in pastry flour by hand being careful not to over mix. Refrigerate for 30 minutes to stabilize the dough.

Form into football shapes about the size of small walnuts and place on a buttered cookie sheet.
I used a cookie scoop to form small round dough shapes. Press lightly with bottom of lightly-floured glass.

Bake 10-12 minutes or until just beginning to get the slightest bit colored on the bottom. Remove upon the first sign of color and set on a rack to cool. When cool enough to touch place in a bowl with powdered sugar on top and bottom and toss gently.

Occasionally toss with sugar while cooling, trying to get as much sugar as possible to stick. When cold, place cookies in airtight container and cover until ready to serve.

Monday, August 24, 2009

Rice Pudding – 2 ways

The heat is finally beginning to waver. Instead of a steady triple digit temperature, we’ve cooled down into the ninety’s. It’s not cool enough to have the oven on for cookie baking or that luscious “black and white” pound cake I’ve been wanting to share with you (unless I get up at 5:30 in the morning and that’s NOT going to happen!). So I opted for something simpler…something comforting…something that reminds me of mom. Rice Pudding. This was one of her comfort foods. We always had rice at home (as well as beans, pinto beans) so eating it as something other than Mexican rice was quite a treat.

Well, you guys have come to know me well enough to know that I would take that delicious recipe and attempt a chocolate version. I wasn’t really sure how it would come out; I’ve never tried it before. But let me tell you, I’m making this again. The Mexican chocolate (Chocolate Abuelita) addition to the basic recipe made it a keeper. It doesn’t take much to make something special for yourself or for your family; you just have to want to do it. See what you have at home…in the pantry, and dress up an old recipe. You won’t regret it.

Basic Rice Pudding Recipe

2 cups water
Pinch of salt
¾ cups uncooked long grain white rice
1 (12 ounce) can evaporated milk
1/3 cup sugar
1 stick cinnamon
1 tablespoon butter
1 teaspoon vanilla extract
1/3 cup raisins (or in my case, craisins…I love them)
2 squares Abuelita chocolate
¼ cup whole almonds
Ground cinnamon, optional

In a medium sized saucepan, bring water and salt to a boil. Add the rice and bring back to a boil. Cover and reduce heat to medium heat. Allow to cook for 25 to 30 minutes until rice is completely soft.Add the evaporated milk, sugar, cinnamon stick, butter and vanilla. Continue to cook on low heat (uncovered), occasionally stirring to keep from sticking, for about 30 minutes.

Divide the cooked rice in two. Add the craisins to half and the chocolate to the other. Once the chocolate has melted, fold in almonds. Sprinkle ground cinnamon to the “white” rice pudding if desired.
Check out the Southern version of this delightful dessert over at Tina's Mommy's Kitchen. You'll love that one too. Enjoy.

Wednesday, August 19, 2009

Spiked Espresso Cooler

Two postings ago I showed you how I made my Mocha Frappuccino. I loved it and I hope you tried it. This time around, I wanted to tweak it just a bit. Cleaning out the freezer I found that my lovely husband had bought me some Haagen-Dazs Coffee ice cream in those tiny containers that I love. You can just grab and go. No need for a bowl. And if you just let it soften just a bit, there’s no need for a spoon, just sip it. Of course Haagen-Dazs does supply a tiny little plastic spoon right under the top, but I like to sip or gulp. I know, I know. Just ask my brother Jose. I’m “rustic” through and through.

Bob doesn’t get home until 8 o’clock tonight so I figured I’d treat myself to something special without getting the “look” and feeling guilty.

A little Mocha Kahlua, a little cream, some fresh espresso and two little (4 once) containers of coffee ice cream. Into the blender they go and my 102 degree hot afternoon cooled off rather nicely.

So here’s my way to stay cool in El Paso, A Double-Shot Espresso – Mocha Kahlua – Coffee Ice Cream Cooler. Delicious.

2 (4 ounce) cartons of ice cream, coffee or vanilla
2 shots espresso
1 shot Mocha Kahlua Liqueur
1 shot heavy cream (or half and half)
Whipped cream, optional

Place all ingredients in blender and blend. Pour into glass and top with whipped cream if desired. Enjoy.

Friday, August 14, 2009

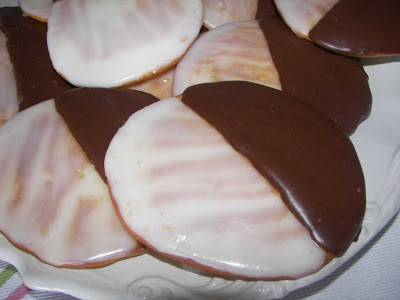
Black and White Cookies

(I apologize for the lack of posts this week. Our internet service has been down more often than working. Apparently there was a fire at the cable company and they are running on generators!!!)

A few years go, we went to Mystic, Connecticut to visit my brother Jose and his family.
Before going, I knew that I wanted to visit New York at least for one day. I envisioned pretzels, hot dogs, street performers, taxi cabs (I refuse to take the subway – been there done that, won’t do it again!), and black and white cookies.

We took the train from CT into New York City. It was a lovely ride. Once getting to Grand Central Station, we walked and shopped and ended up eating at the Carnegie Deli. It was so good. The sandwiches were big enough to feed two people and the cheesecake dessert was large enough to feed four. My tummy was very happy.

What I never saw were the black and white cookies. I so wanted to savor that sponge-like sweetness covered in vanilla and chocolate fondant. Ah, well, maybe next time.

The thought has never left my mind though. So, I’m sitting here thinking, what the heck? Just make them at home. I’d seen the recipe in the Martha Stewart Cookie book I had as well as on the food network site, so I plunged ahead in hopes that my cookies would be just as good as what I’d read about them. I don’t (yet) know what New York Black and White’s (or Half Moons as they are sometimes called) taste like, but I sure did like the ones I made. I’m sharing them here with you. If you’ve seen or eaten the originals, don’t judge me too harshly. It was semi-difficult to get the white icing to cover completely, but they still taste delicious. Enjoy.

I used the Martha Stewart recipe for Black and Whites. The only difference was that I used Mexican Chocolate for the "black" side of the cookie.

Black and White Cookies
Martha Stewart Cookies
Ingredients
Makes 10.

1 cup all-purpose flour
2/3 cup cake flour, not self-rising
1/2 teaspoon baking powder
1/4 teaspoon salt
2 large eggs
3/4 cup granulated sugar
1/2 cup milk
6 tablespoons unsalted butter, melted and cooled
1/2 teaspoon pure vanilla extract
1/2 teaspoon pure lemon extract
2 cups confectioners' sugar, sifted
2 tablespoons light corn syrup, plus more if needed
1 1/2 ounces bittersweet chocolate, melted

Directions
Preheat oven to 350 degrees. Sift together flours, baking powder, and salt; set aside. In a medium bowl, whisk eggs and sugar until smooth. Add milk, and whisk to combine. Whisk in melted butter and extracts. Add flour mixture, and stir to form a smooth dough. Cover, and chill for 1 hour.
Line baking pans with Silpat nonstick baking mats. Using a 2-ounce scoop, drop five cookies per pan, 3 inches apart. Bake until edges are light brown, 12 to 15 minutes. Transfer cookies to a wire rack set over parchment paper to cool.
In a small bowl, combine confectioners' sugar, 3 tablespoons hot water, and corn syrup. Whisk until smooth. Using a small offset spatula, ice half of each cookie. Return cookies to rack to drip, if necessary.
Add chocolate to remaining icing. Stir until smooth. Add additional corn syrup to thin to desired consistency, if necessary. Spread chocolate icing over second half of each cookie. Allow cookies to set, about 10 minutes.

Hayley, from Buff Chickpea has a wonderful post on Black ad White Cookies. Here is a little of what she has to say about this tasty treat:

“Did You Know? "Back in the day, black and white cookies were actually made by bakeries from their leftover cake batters, with just a little extra flour mixed in so the cookie didn’t spread all over the place. Sometimes called Amerikaner Cookies, they’re also occasionally referred to as "half-moons" Upstate and in New England. However, with a chocolate cake base, not the traditional vanilla/lemon one, they’re not the same thing..." Deb of Smitten Kitchen.”

Another great recipe for black and whites was put out by Duff Goldman from Ace of Cakes. You might want to read his version.

Whichever version you decide to use, I'm sure they will be delicious. Have fun.

"Everyday People Cartoons

Friday, August 7, 2009

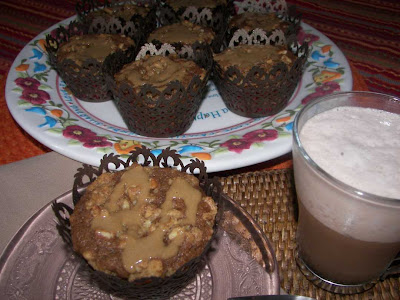
Espresso Muffins and Mexican Chocolate Frappuccino

Isn't this delightful? Originally I had intended to post this yesterday, but life being what it is, I got side tracked. Those beautiful espresso muffins come from the lovely Ms. Reeni at Cinnamon Spice and Everything Nice. I knew when I saw them on her blog that I had to make them for myself. The recipe was perfect. It made a whole dozen. No, I'm not going to eat them all in one sitting (although I could). I'll leave one or two for Bob.

The drink? It's my version of a Mexican Chocolate Mocha Frappuccino. The original recipe comes from the Recipe Zaar. And as we all do, I modified it to quench my own personal tastes. This recipe was also suppose to go up yesterday. My apologies to Megan from Megan's Cookin'. I'm sorry I let you down, but here it is. I hope you enjoy it. She's had some amazing coffee drinks on her blog lately which is what got me thinking about doing this one.

Hope you get the opportunity to give these little chocolate diddy's a try.
They are DELICIOUS.


Espresso Coffeecake Muffins

(Reeni at Cinnamon Spice and Everything Nice)


The changes or additions I made are in red.

1 and 1/2 cups flour (1 ¼ cup flour, ¼ cup ground Abuelita chocolate)
1/2 cup sugar
2 teaspoons baking powder
1/2 teaspoon salt
1 tablespoon instant Espresso
1 tablespoon boiling water
1/2 cup butter, melted
1 egg1/3 cup milk
1 teaspoon vanilla extract

Topping:
1/4 cup packed brown sugar
1/3 chopped almonds (I didn't have almonds, so I used pecans)
3 tablespoons flour
1 and 1/2 tablespoons butter

Glaze (recipe follows)
Preheat oven to 375 degrees.

In a large bowl combine the flour, sugar, baking powder, and salt. In a small bowl dissolve the Espresso in the boiling water. Add to flour mixture with the butter, egg, milk, and vanilla. Stir to combine, don't over mix. Batter will be thick.

Fill muffin tin/baking cups 3/4 of the way. Sprinkle with the topping, dividing equally among the muffins, press into batter gently.

Bake for 18-20 minutes until toothpick comes out clean. Drizzle with glaze.

Glaze:
1/2 teaspoon instant Espresso
1 teaspoon boiling water
1/4 cup packed brown sugar
vanilla extract, a drop (1 drop Abuelita syrup)
1/4 cup confectioners' sugar
2-3 teaspoons milk

Dissolve the Espresso into the boiling water in a small bowl. Add the brown sugar and use a fork to combine the two. Add a drop of vanilla. Add the confectioners sugar and 2 teaspoons of the milk. Whisk until well combined. If glaze is thick add another teaspoon of milk. Whisk. Drizzle over the warm muffins.

Mexican Chocolate Mocha Frappuccino
(original recipe from Recipe Zaar)

2 large glasses
1/2 cup milk
2 tablespoons chocolate syrup (Abuelita syrup)
1 tablespoon granulated sugar, plus
1 teaspoon granulated sugar (do not use if your using Mexican Chocolate)
1/3 cup strong coffee ** (I used my small French Press to make some VERY strong coffee)
1 cup ice
In a blender, combine everything but the ice, and blend until sugar has dissolved.
Add ice and blend until smooth (sometimes you will need a bit more ice).

Amazing how a few ingredients you probably already have in your pantry can save you 3 to 4 dollars at the coffee shop!

French Press
2 rounded tablespoons coarse grind coffee beans
4 ounces water (195 degrees)

This will make 1/3 to ½ cup of strong coffee.

*********************
"If I eat equal amounts of dark chocolate and white chocolate, is that a balanced diet?"

Wednesday, August 5, 2009

Lily’s No-Bake Dulce de Leche Cheesecake

Before heading out to Dallas, Lily wanted to cook a birthday dinner for her Dad since she was going to miss it by 2 weeks. She and Brian (her BF) made a delicious blue cheese topped rib-eye steak on the grill, Tony Roma’s Onion Loaf (recipe courtesy of meemoskitchen), ham wrapped and roasted asparagus and for dessert this delicious cheesecake.

I’m a sucker for food magazines, even if there are only one or two recipes that catch my fancy when leafing through it. Woman’s World magazine, the one you find at the checkout counter at the grocers, had this wonderful looking no bake cheesecake recipe in it. It’s called “No-Bake Mexican Flan Cheesecake”. Well, my daughter being my daughter and always looking to modify and adapt to her tastes (I taught her that!), she decided to top the cheesecake with that wonderful Dulce that Leche sauce we made a couple of months ago. Instead of using almond cookies, she used crushed Oreos. Needless to say, it turned out quite tasty. As you can see, this recipe just begs to be modified any way you like. Various toppings – various fruits – various bottom crusts. I hope you give it a whirl. Enjoy.

Lily’s No-Bake Dulce de Leche Cheesecake
(Inspired by recipe found in Woman’s World Magazine, July 27, 2009)

1 dozen Oreo cookies
¼ cup butter, melted
2 tablespoons honey
1 tablespoon vanilla
1 envelope (1/4 ounce) unflavored gelatin
3 packages (8 ounces each) room temperature cream cheese
1 can (14 ounce) sweetened condensed milk
¼ teaspoon ground cinnamon
¼ teaspoon salt
3 cups Cool Whip

Dulce de Leche Sauce
Strawberries

Coat an 8-inch spring form pan with non-stick cooking spray.
Pulse Oreos in a food processor until crumbs form. Add melted butter until well combined. Press firmly into bottom of pan.

In a small microwave-safe bowl, combine honey, vanilla and 1 tablespoon water. Sprinkle gelatin over mixture and let stand 5 minutes. Microwave 5 seconds and stir until gelatin is dissolved.

Beat cream cheese and milk on medium high speed until smooth, about 2 minutes. Beat in gelatin mixture, cinnamon and salt, about 1 minute. Fold in 2 cups of the Cool Whip and spread cheese mixture in prepared pan. Cover with plastic wrap for 8 hours or overnight.

Run a knife around the edge to loosen. Remove sides of pan. Transfer to a serving plate and spread Dulce de Leche sauce over the top allowing some of the sauce to drip down the sides. Top with the last cup of Cool whip and garnish with strawberries.
 

blogger templates | Make Money Online